Overview
Estimated setup time: 30 minutes.
There are three main steps to setting up the integration:
- Create an integration system user (ISU) and a security group for that user.
- Assign the required permissions to the security group, then activate the changes.
- Generate a new API client.
The rest of this guide walks through each step in detail.
Integration Prerequisites
You need to be an admin of your Workday account before you start.
-
Log into Workday and search for "View API Clients".
If you cannot see this menu item, you are not an admin of the Workday account. Find out who your Workday admin is and ask them either to give your account sufficient permissions or to take over the integration process.
Permission Requirements
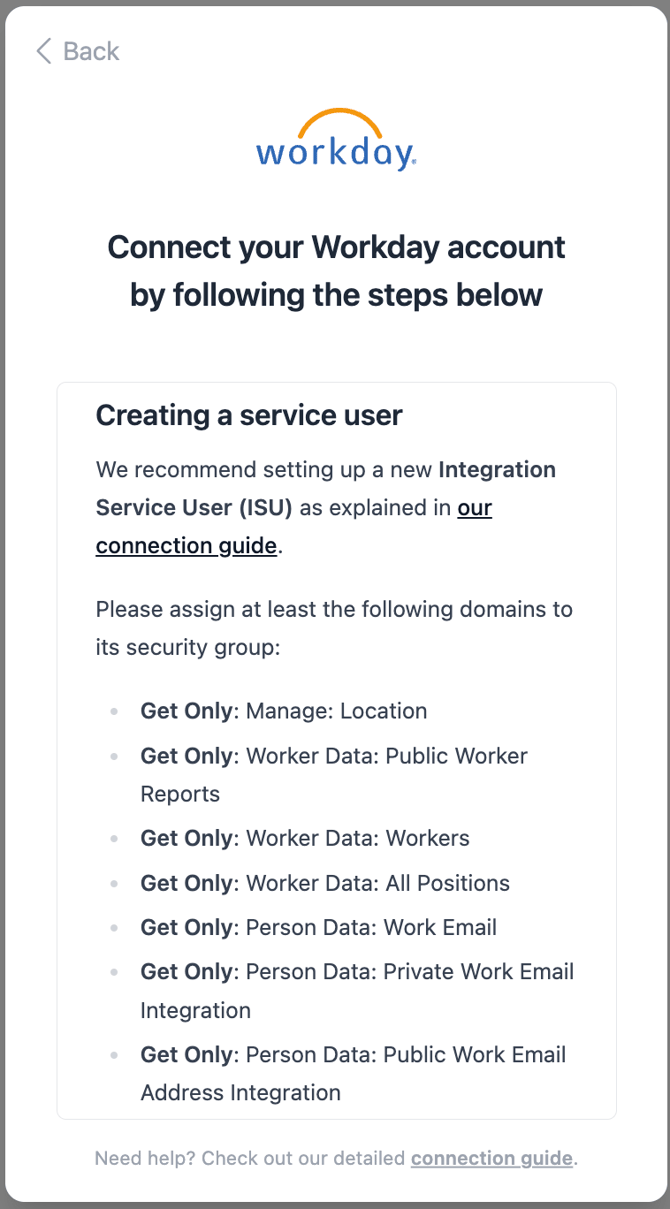
Assign at least the following permissions to your security group. They are grouped by Workday functional area, which is how you will see them in Workday.
Every permission is Get Only. Ravio never writes data back to your Workday instance.
| Functional area | View/Modify access | Domain security policy | Why Ravio needs it |
|---|---|---|---|
| Contact Information | Get Only | Person Data: Private Work Email Integration* | Reading work email addresses that your instance holds as private contact information. Used to match employees between Workday and Ravio. |
| Contact Information | Get Only | Person Data: Public Work Email Address Integration* | Reading work email addresses that your instance holds as public contact information. |
| Contact Information | Get Only | Person Data: Work Email* | Reading a worker's work email address. |
| Core Compensation | Get Only | Worker Data: Compensation by Organization | Reading compensation data. Used for pay currency, pay period, and pay rate. This is also where variable pay usually sits. |
| Organizations and Roles | Get Only | Manage: Location | Reading job locations. |
| Organizations and Roles | Get Only | Manage: Organization Integration | Reading group information, such as cost centres and companies. |
| Personal Data | Get Only | Person Data: Gender | Reading a worker's gender. Needed for gender pay gap reporting in Ravio. |
| Staffing | Get Only | Worker Data: All Positions | Reading position information such as manager, location, and job title, plus status data about the worker. Always needed when reading any worker data. |
| Staffing | Get Only | Worker Data: Current Staffing Information | Reading the status of a worker. Used for termination date and employment status. |
| Staffing | Get Only | Worker Data: Organization Information | Reading which worker sits in which group, such as cost centres, departments, and companies. |
| Staffing | Get Only | Worker Data: Public Worker Reports | Reading public information about a worker, meaning anything any colleague can already see, such as first and last name. Always needed when reading any worker data. |
| Staffing | Get Only | Worker Data: Workers | Retrieving worker data from Workday's web services. Always needed when reading any worker data. |
*On the anonymous flow, employee personal data is not needed to keep your data anonymous in the Ravio app.
🎉 Ravio supports automatic ingestion of variable pay data from Workday.
To use it, grant access to wherever variable pay sits in your Workday instance. That is usually Worker Data: Compensation by Organization, but if you hold it in a custom category, include that too.
🚨 Fields held in custom objects need separate permissions.
This usually applies to level or grade information. Workday stores custom objects differently to standard fields, so follow the custom objects guide and send your Ravio contact the "System ID" at the end.
Step by Step Integration Setup
This is a step by step guide on how to use Workday’s standard APIs to integrate with Ravio.
If you've opted for the Anonymous Flow with Ravio, follow the standard instructions up to Step 4. At that point, switch to the Anonymous instructions (there will be a reminder!).
If you have any fields (usually level or grade information) that we need access to and that you store in Custom Objects, permissions for these need to be provided separately, as Workday stores them differently. Please follow the steps in the Custom Objects section.
This integration process should take around 30 minutes for a Workday admin to complete.
Step 1 - Workday Service URL
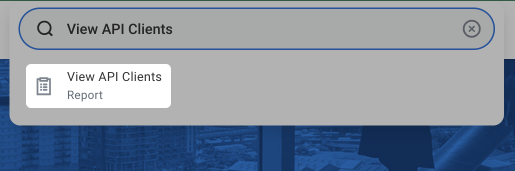
In the search bar at the top, search for and navigate to the ‘View API Clients’ report.
At the top of the page find and copy your Workday REST API Endpoint.
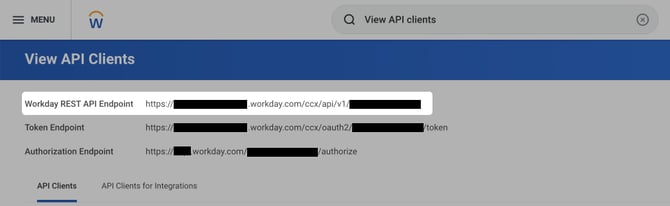
Save this in a document as it will be required later!
Step 2 - Create a new integration service user (ISU)
In the top search field, enter "Create Integration System User". Then, click on the task with the same name that appears.
In the dialog that just opened, enter a username and generate a secure password that meets your organisation’s password requirements. Ensure Require New Password at Next Sign In is not checked then click OK.
Make sure to save these login details somewhere secure!
Step 3 - Add newly created ISU to your list of system users
While the newly created ISU will work for linking your Workday account, its password will expire after some time unless you add it to your list of System Users. This will break the integration between Ravio and Workday and will require manual work to get this working again.
-
Search for the task "Maintain Password Rules" in the top bar:
-
Once on that task add your created ISU to the list of "System Users exempt from password expiration". This will stop the integration from breaking when the password expires.
Step 4 - Create a new Security Group and assign the new ISU
Search for "Create Security Group" in the search bar then click on the associated task that appears.
On the page locate the dropdown "Type of Tenanted Security Group" and select "Integration System Security Group (Unconstrained)".
For the "Name" enter the same username you entered when creating the ISU earlier (in this case it would be test_isu, but yours will be different), then click OK.
On the next page, the only thing you have to do is go to the field "Integration System Users" and add the ISU you created earlier. You can do this by clicking on the field and typing in the name of the ISU (in this case test_isu).
Step 5 - Assigning the required permissions
🚨 If you have signed up for the anonymous flow, do not grant permissions for any name data, including first name, last name, and full name.
There are two ways to give Ravio the permissions it needs:
- Assign the permissions directly to the security group.
- Provide the "System ID" to Ravio to expose the fields via API.
Assigning the permissions directly to the Security Group
Search for "Maintain Permission for Security Group" and click on the task that appears.
In the form that appears, make sure to select Operation = Maintain and make sure the security group you created is in the Source Security Group.
In the window that just appeared, you can add the permissions you want for the ISU. You can find the list of permissions needed in the connection flow. The permissions we need at listed at the bottom of this page, they are different for full onboarding and for anonymous onboarding. The image below is an example.
For each permission, repeat the following process:
- Make sure the tab "Domain Security Policy Permissions" is selected and click on the icon with the "+" on it:
-
Click on the cell in the column "View/Modify Access", select "Get Only".
-
Click on the cell in the column "Domain Security Policy", type in the name of the policy (i.e. "Integration: Build"), hit enter and click on the item that just appeared in a list
Repeat for all required permissions. You can see full details of what permissions Ravio may require and why we need them in the Permission Requirements section below.
Step 6 - Activate your changes
After making any changes to your Workday security policy settings, make sure to apply those changes by executing the "Activate Pending Security Policy Changes" task. Without that, none of your changes with take effect.
To do this, search for the "Activate Pending Security Policy Changes" task.
In the window that just appeared, add any comment for applying the changes (i.e. "Grant ISU test_isu necessary permissions for integrations"). We recommend that this is as decsriptive as possible to allow others to see the tasks provided.
In the new window, check the box "Confirm". These changes are now active.
Step 7 - Create an API client
Click on the "Search" field at the top and enter "Register API Client for Integrations".
In the window that just appeared, enter a "Client Name", i.e. "ravio_isu API client"
Make sure the option "Non-Expiring Refresh Tokens" is turned on
In "Scope (Functional Areas)", select all of the following:
- Tenant Non-Configurable
- Organizations and Roles
- Staffing
- Contact Information
- Personal Data
- Core Compensation
- System
- Workday Designer
- Worker Profile and Skills
The same list is shown to you in the Ravio connection flow.
In the new window, copy the Client ID and Client Secret for later use, then do not click "Done"
Still on the same page, click the three dots at the top, then "API Client" > "Manage Refresh Tokens for Integrations"
In the new window, enter the name of the ISU that you created earlier. Click "OK".
In the new window, check the box for "Generate New Refresh Token". Click "OK"
In the new window, copy the refresh token and store it for later use
Step 8 - Enter the credentials into Ravio
Enter the below information when prompted in the app
Enter the REST API endpoint you found above into the Ravio onboarding screen. This is the Workday Service URL from Step 1.
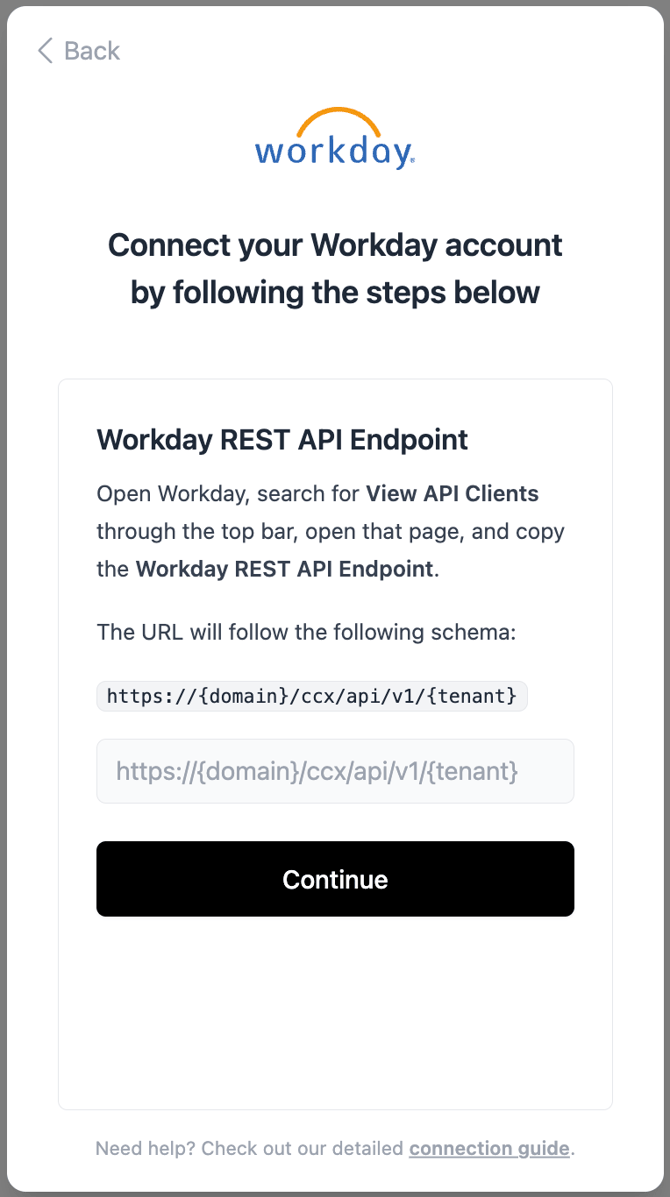
Enter the Client ID, Client Secret and Refresh Token for the API Client we created above.